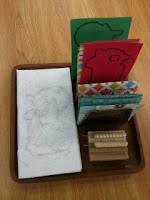
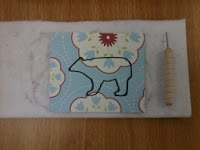
salt dough maps

Australia by child age 3 1/2

salt dough recipe: equal parts water, sea salt, and (a little more) whole wheat flour
materials:
(day 1)
prepared salt dough
small containers for prepared salt dough
prepared pieces of thick cardboard (not the cereal box type) with outlline of the continent or land mass
tool to spread salt dough; examples: tongue depressors, plastic butter knife, plastic spoon.
blue paint for water on the map
paint brushes
small container to hold blue paint
(day 2)
paint (corresponding to the montessori continent maps)
paint brushes
small paint containers

2 day process:
Prepare this activity well in advance. Decide whatever land mass you want to focus on. Prepare the children for this activity by showing them where the continent or land mass is located on the globe and/or the hemispheres map. Invite the children to make their own maps. "Would you like to make your own map?"

DAY 1:
  1. Have a piece of cardboard with a traced outline of the continent prepared for each child. Have the child write their name on the back of their peice of cardboard before you start.
  2. Show the child where and how they will be spreading the salt dough. "When you spread the salt dough on the map, make sure you stay inside the lines. This will be the land part of the map. When they are done spreading the salt dough all over the inside of the black outline allow them to clean up their work area to prepare for the naxt step of the process. Allow them to take their time and make sure that all the salt dough is washed off of the tools and wiped off of the surface of the table.
  3. Next, show them how you will be painting the outside of your landmass - siginifying water or "ocean".
  4. Watch but do not hover to make sure that they are not painting the wet land mass.
  5. Have the child place their map in a safe and clear area to dry over night.
  6. have the child wash their tools and return the materials to their storage area.
DAY 2:
  1. After the salt dough map has been drying for 24 hours the salt dough should be dry enough the paint over. Check when on your own (when the children are not around) by poking the salt dough with your finger or a toothpick to make sure the dough is fully dry.
  2. Paint the continent the color it is on the continent map :
RED : EUROPE
ORANGE : NORTH AMERICA
YELLOW : ASIA
GREEN : AFRICA
PINK : SOUTH AMERICA
WHITE : ANTARCTICA
BROWN : AUSTRALIA

Continent/Geography shelf: Step (1) tray set up; one person job

Montessori Botany: The Fruit

parts of a pear

During group time explain to the children that you are going to examine the fruit. Place a pear onto the cutting board, and talk about the shape, color, texture, plant v. animal, where it grows. Carefully cut the pear in half. Otherwise have a pre-cut pear on hand. Be sure to sprinkle the exposed part of the pear with lemon juice to preserve the color so it doesn't start to turn brown. Return the knife and lemon juice to a safe place. Have the children take turns describing what they see. Assist the children in naming the parts of the fruit. Use the 3 period lesson. Place the fruit on the nature table for the children to observe. Make 3 part cards and books available to children.
parts of a pear 3 part cards:

parts of a pear book:


Nomenclature:
pericarp- the walls of a ripened fruit
exocarp- the outer layer of a pericarp
mesocarp- the flesh part of the fruit
endocarp- the inner layer of a ripened fruit
stalk- the part of the fruit attached to the stem
seed- the part of the fruit used to reproduce the species
calyx- the set of fruit sepals of the pear blossom that reamains on the fruit
History:
Pears are native to coastal and mildly temperate regions of the Old World, from western Europe and northern Africa and east across Asia... read more here

parts of a dump truck

model dump truck bought at rite aid


Three part cards are used in Montessori classrooms after the child has had sufficient familiarity matching pictures and patterns - also known as 'graphic matching'. Graphic matching is one of the first pre-reading activities that young children can do. By matching pictures that are exactly alike they are using visual cues and one-to-one matching skills important to reading. The primary aim with this work is the development of visual discrimination. Three part cards on the other hand are the next level up and incorporate all of the above plus the vocabulary associated with the picture.

Three part cards lesson:

Materials:
  • three part card tray or container to hold 3 part cards
  • model of object if the subject is learning the "Parts of..."
  • three part cards
  • rug or mat
Direct Purpose:
  1. development of visual discrimination
  2. preparation for vocabulary
Indirect Purpose:
  1. development of left to right tracking needed reading

3 part card KEY
Presentation: Gauge the interest and readiness of the child. Show the child where the material is located on the shelf. Carry the job to a mat or rug. Remove the model dump truck and all the cards from the container and place the container in the upper left hand corner. Place your three sets of cards in their own piles to the left of you on the rug/mat. Place the model dump truck in front of you. Place the control cards (set 1: picture + label) in a horizontal row at the top of the rug/mat. Say the names of the parts of the dump truck and point them out as you lay down each card. Next match the second set of cards (set 2: picture no label) to the top control set (set 1). Do this slowly from left to right allowing the child to discriminate. Allow the child to match one card at a time as you have shown them with the first few. Next match the labels (set 3: label only). Do this slowly as the child has more abstract things to discriminate. Use your finger to point out the first letter in the control set (set 1: picture + label) and compare it to the label (set 3: label only), do this for every letter on the label until you find the matching control card.

Points of interest:
  1. variety of cards (should be changed often)
  2. classification of cards
  3. learning new words
Control of error:
  1. control cards (set 1)
Isolation of difficulty: classifying by a common factor or characteristic


sewing in the montessori primary classroom

Direct purpose is to develop hand-eye coordination, and muscular control.
Indirect preparation for writing.

PREPARATION OF THE ENVIRONMENT:
Traditionally the sewing material has been stored on the practical life shelf layed out in baskets (which takes up lots of room). I have stored each step in drawers such as those made of plastic (ikea no longer makes the FERA wooden drawers :(   you'll have to score them second hand). The drawers serve as a storage unit for the materials. The children use a flat basket or small tray to gather the tools and materials from the drawer they are qualified to use.
Here is an example of what I mean:  


pin cushion practice

Practicing pushing pins into a pin cushion is an absorbing fine motor activity appropriate for the mature child that is interested in sewing. This job is also perfect for children who are not quite ready for the multiple steps required in most sewing activities.
Materials: extreme caution, watchful and attentive adult, 12-18 pins varying colors to be sorted, small dish for pins, pin cushion, dish for pin cushion, tray to hold all materials.
Presentation: Invite the child to do the exercise. Show them where the material is located on the shelf. Carry the tray carefully to the table. Sit on the child's dominant side. Talk about the precaution needed in using this material. 'These pins are only for the pin cushion' , 'Always make sure the pins stay with the job', etc. Remove a pin from the dish using your dominant hand holding it between the index finger and thumb. With your sub dominant hand, hold the pin cushion in place so it doesn't get away from you while you are pushing the pin in to it. Finish the task of pushing each pin into the pin cushion. Remove the pin from the pin cushion before replacing the job on the shelf. Allow the child to do this job if they have had a lesson. Use your best judgment in placing this material in you classroom. The intent is to teach children how to the sewing materials responsibly.
 
oil cloth / embroidery practice stitch practice

1.
This would be considered drawer (1) of your storage unit if you are choosing to consolidate this unit. This is an extension to the lacing boards we are all accustomed to. This activity is SUPER easy to make yourself and with the varieties of oil cloth these days, the possibilities are endless!
Just make sure to pre punch the holes with a hole punch.
Materials: small wood  embroidery hoop, oil cloth of your choice & shoe lace (one side stiff / one side knotted).
Presentation: Invite the child to the lesson. "We are going to practice stitching." Show the child where the material is located on the shelf. Show them where the baskets for gathering the materials are located. Get a basket, hold it firmly in one hand and open the top drawer with the other hand gather one lace, one embroidery hoop with oil cloth attached. Take your materials back to the table. Place the basket in the upper left hand corner of your work area. Place the hoop with oil cloth attached to the right of the basket. Begin by unwinding the lace and placing it across the table in front of you. Place the stiff side to the left and knotted side to the right. 3 finger pincer grasp the left side of the lace with your dominant hand. Pick up the hoop with oil cloth attached with your sub dominant hand. Flip the hoop over and thread your lace through one of the holes. Gently pull until you can pull no further - the knot at the end of the lace should stop you from threading any further. Flip the hoop over and continue the over and under motion until there are no more holes to be stitched. Before returning the material to the drawer make sure your remove the gently remove the lace from the oil cloth. Oil cloth can tear if it is pulled to hard so to preserve the integrity of the material make sure that you are gentle when removing the lace. Once you have removed the lace from the holes in the oil cloth, you can begin winding up the lace. Use the middle and index fingers of your sub dominant hand to wind the lace. Finished!

    The oil cross stitch practice is also stored in the first drawer. It is one step up from the stitch practice above. The challenge in this job is that the holes for stitching are smaller and the child is expected to cross stitch. Assume the lesson plan for stitching but be aware that you are to continue your stitches diagonally so as to create the cross stitch design.
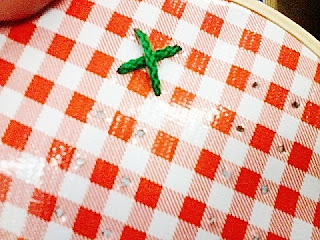
oil cross stitch practice
You will want to make this material too. It is a little more detail oriented to make. I bought gingham oil cloth for this. I imagine you can use whatever oil cloth you can find for this. You will notice with this material that the holes for practice are much smaller than the holes made by a hole puncher. The way that I did this was by burning the holes with a heated extra large safety pin. I made this material in a well ventilated area away from children. I pre marked the holes with a permanent marker before I began making the holes. I used a lighter and an extra large safety pin. First,  I heated the safety pin and while it was hot, punctured the places I marked. I had to heat the pin every time I punctured and there was a tiny bit of smoke. Allow the melted oil cloth to completely dry before working with it, I suggest overnight. The type of lace I used for this was slightly smaller in width only because I had some extra laying around.

2.
running stitch on burlap
This activity is another stitching activity except the children can take this one home. Burlap can be found in many colors. I myself have found colors for every season. Can you guess what month this picture was taken in? Drawer (2) Materials: extra small embroidery hoop, squares of burlap with one line pulled out, extra large needles and yarn/embroidery floss.
Presentation: Invite the child to the lesson. Show the child where the material is located in the shelf. Show the child where the baskets are located to gather the material from the drawer. Hold the basket with you sub dominant hand while using your dominant hand to pull open the drawer and gather your material. For this activity you will gather one embroidery hoop, one piece of burlap, one large needle and yarn/or embroidery floss. Go to the table. Sit on the dominant side of the child. Place your basket in the upper left hand corner of your work area. Show the child how to open the embroidery hoop by unscrewing the clasp and opening the hoop. Place your burlap over your small hoop and then place your larger hoop over that. Screw the clasp to the hoop shut. Next you will need a pair of scissors from the art shelf. Bring the scissors back to the table on a small scissor tray. Place the scissors just below the basket of materials. Take the yarn/ or floss from the basket and measure one arm length and cut it at that length. Thread the yarn/or floss through the extra large needle and tie off the end. Place your threaded needle through the far left side of the hoop and pull. Stitch up and down through the burlap where you had pulled the burlap string out before. Make sure you stitch through each opening in the burlap so that the stitches are real close. When you have reached the other end of the burlap, you can stop and tie off the yarn or floss. Show the child how to take the burlap out of the embroidery hoop and how to carefully put the hoops back together without splitting the wood. Return the material to the drawer and the scissors back to the art shelf. 
Note: due to the size of the needles I stored them in a left over piece of burlap instead of a pin cushion, you can also store the needles in an extra small tin box. Also you do not need an embroidery hoop for this lesson, I use it initially for control of movement. Good Luck! 

 3.
embroidery prep on thick grid plastic
 Drawer (3) materials: embroidery patterns, large  needles, variety of colored floss.
Assume the lesson plan for the lesson for the burlap stitch lesson. This activity is a more direct preparation for embroidery while still using the regular stitch. Prepare this activity by purchasing stiff embroidery material and/ or plastic shapes from your local craft store. Children can stitch in and out of the open spaces filling all of them until there are no more to fill. I like to give the children a choice of embroidery floss color. Children love this activity because they get to use the stitching skills they have learned to fill in interesting shapes. 


4.
Button sewing can be fun for you, the children and the community. Ask parents in one of your school newsletter for button donations. If you end up with more buttons then you can sew, you can always use them in other areas of practical life such as pouring, sorting, spooning, whole hand transfer, etc. This would be Drawer (4) and you will need: 1 embroidery hoop, cloth, variety of buttons, medium needle, pin cushion, and thread/floss.

 
button sewing
Invite the child to the lesson. Show the child where the material is located. Retrieve a basket to hold the materials you will be gathering: 1 arms length of embroidery floss/thread, one needle in pin cushion, scissors (on tray from art shelf), small box of buttons, 1 small piece of cloth, and 1 small embroidery hoop. Begin by pulling out one arms length of floss/thread, cut it, thread it, and knot it. Place it back into the pin cushion for safe keeping for now. Open the embroidery hoop carefully so as not to split the wood. Place the piece of cloth onto the small embroidery hoop and close the larger hoop over it, clasp it shut and place it to the left. All the while choose a button you would like to sew to the cloth. Begin sewing the button to the cloth by pushing the needle through the bottom part of the embroidery hoop and pulling it through. String the button you have chosen on to the needle and thread. Push the needle through the cloth close to where the initial thread was pushed through and pull. Now the button is held in place by this one stitch. Continue as before 2 or 3 more times until you end up on the bottom side of the embroidery hoop. Tie a knot and cut the string. Start sewing another button but remember to tie the end of your string first! Let the child sew to their hearts desire. Help them as needed, like when they accidentally go around with the needle and get all tangled up. Go slow when you are showing them and over emphasize the up and down motion of the button sewing.
Note: in the past I have used heavy fabric like canvas, when you go into the craft store this material can be pricey. If it is not with in your budget to pay for the going price of a heavier cloth consider second hand cloth napkins. I have bought stacks of cloth napkins from goodwill with the sole intention of cutting them up and using them in the sewing drawers.

5.
  
finger puppet

This possibly the climax of the child's whole sewing experience. As with all the jobs on the shelf there are lessons that must come before others. In this case, drawers 1-4. In this picture the templates have been pre cut for the children. I have seen it where the child gets a piece of felt and is supposed to trace and cut the finger puppet template themselves. I would love to that. I made the  tiny pin cushion for this job because I needed a pin cushion.
Here are the materials needed for this drawer: various colors of cut felt small enough to fit a child's finger (1.5'' x 2''), thread, needle, 2 pins, pin cushion, tacky glue, googly eyes, cotton balls (or balls of wool), and scissors from the scissor shelf.
 Presentation: Invite the child to the lesson. Show them where the material is located, they should already be familiar with gathering the materials. Instruct them on what to get. Let them choose two alternate pieces of felt or matching. Alternating patterns help them control the pattern of  movements needed for the proper stitch. In order for there to be consistency and so that the edges of the pattern don't crinkle, keep with the same stitch we've been using all along - up and down stitch (not the round about stitch). The thread is not shown in the picture because by this time I was using the thread station shown below. This station is aesthetically pleasing, a curiosity to the children, and incorporates movement! Place the basket in the upper left hand corner of your work area. Lay out your materials in the order in which they will be used: pin cushion, thread, two pieces of the puppet, one cotton ball, and two eye balls. They should already know how to thread the needle, they may need help tieing. Pin the two pieces of felt together and begin stitching in the lower left hand side of the puppet. STOP before you sew the puppet shut. Stuff the puppet with the cotton and glue on the eye balls. You may choose to draw a face with a permanent marker. Finished!

LINKS:


6. 
dolls and pillows
Drawer (6) follows the same lesson as the drawer prior except, before you sew it all the way shut you stuff it with filler. you can buy filler at the fabric store or you can buy a pillow for under $5 at a store that sells home stuffs. Again, you could have the children trace and cut their own patterns or you could prep them. You'll need more than two pins depending on the size of your pillow. This a really fun activity because you can tailor it to the seasons and holidays.


thread station made from a wooden paper towel holder ;)

table setting


This is a one person job. It is meant for the young child just entering the Primary Montessori classroom. It is simple enough and rewarding. You'll want to make this material yourself, as I did.

First, I bought a plain white piece of thick vinyl for the mat. Then I shopped around for a small cup, cloth napkin, small dish and small silverware. I had some left over extra small espresso cups left over from a broken pouring job so that is what you see for the cup. I bought the rest at Cost Plus World Market - I just love that store! Anyway, once I had all my items together I layed them out on the vinyl and measured out how much vinyl I would actually need to fit all the items. I trimmed the mat down. I then traced the outline of the items with a pencil so I didn't mark anything up with permanent marker. After the pencil, I cleared off the items and traced over the pencil with a permanent marker and let it dry over nite. Once everything was dry I was ready to transport my items to the shelf. I happened to have a flat 8"x12" rectangular basket that I could store the items in while they are on the shelf. The basket is not actually part of the job or lesson. In fact, you could use a tray to store the items on the shelf if you wanted.

Make sure to check the items daily for smudges. But, there shouldn't be any because part of your lesson should include hand washing before table setting. :) ENJOY!


montessori botany - the garden

            The purpose of growing a garden is to raise the child's awareness of plants. All aspects of a curriculum can be accessed through the garden. You can design a whole years worth of study around plants - studying their germination (birth), life and death (decomposition). Children learn where natural consumer products actually come from. Before taking on this endeavor, introduce the children to fruits, vegetables, and trees native to where you live. Prepare activities aimed at introducing fruits,vegetables, trees and plants familiar to the children.
        

winter garden snap pea blossom

winter garden snap pea

carrots mid December

Gardens awaken an enthusiasm for work, nutrition, learning and community cooperation, responsibility and preservation of the environment. Gardening with children helps develop their understanding of their relationship with nature. Advance planning is important for a successful garden. Consider a sensory garden when selecting your plants. Either way, maintaining a garden promotes gross motor development. Gardening chores such as digging, carrying watering cans full of water, planting and weeding.

Schedule field trips to local lavender farms, berry farms, pumpkin patches, farmers market, orchards, nurseries, etc. Use your local libraries to check out books on plants and horticulture to fill your classroom library. Ask parents if they have old gardening magazines they would be willing to donate for you to use in your classrooms study of plants.

Materials Needed:
buckets, seed markers, desire, commitment, volunteers, sun,water, drainage, soil, access for little people, tools for little people, tool storage, add flowers in the garden to attract pollinators, start a garden newsletter as soon as you have a plan. Plan backwards decide when the harvest will be - preferably before the school year ends so you can have a harvest party!


salad garden to feed the
classroom pets

WORMS are vital to the health of your soil & the
kids love to observe them and hold them

cabbage moth larvae

pests: the children enjoyed seeking these
guys out and picking them up with
tweezers and observing them outside
of the garden

montessori turkey nomenclature FREE 3 part cards & book


Since you may not have access to a real life turkey I would suggest having a turkey replica to go along with the turkey nomenclature 3 part card lesson. Above is a picture of a male domestic turkey from safari ltd., included is a link: http://www.shopatron.com/products/productdetail/part_number=242929/740.0.1.1  
Here are some turkey nomenclature cards if you are interested
FREE parts of a turkey 3 part cards
FREE parts of a turkey book
Three part cards are used in Montessori classrooms after the child has had sufficient familiarity matching pictures and patterns - also known as 'graphic matching'. Graphic matching is one of the first pre-reading activities that young children can do. By matching pictures that are exactly alike they are using visual cues and one-to-one matching skills important to reading. The primary aim with this work is the development of visual discrimination. Three part cards on the other hand are the next level up and incorporate all of the above plus the vocabulary associated with the picture.

Three part cards lesson:

Materials:
  • three part card tray or container to hold 3 part cards
  • model of object if the subject is learning the "Parts of..."
  • three part cards
  • rug or mat
Direct Purpose:
  1. development of visual discrimination
  2. preparation for vocabulary
Indirect Purpose:
  1. development of left to right tracking needed reading

3 part card KEY
Presentation: Gauge the interest and readiness of the child. Show the child where the material is located on the shelf. Carry the job to a mat or rug. Remove the model turkey and all the cards from the container and place the container in the upper left hand corner. Place your three sets of cards in their own piles to the left of you on the rug/mat. Place the model turkey in front of you. Place the control cards (set 1: picture + label) in a horizontal row at the top of the rug/mat. Say the names of the parts of the turkey and point them out as you lay down each card. Next match the second set of cards (set 2: picture no label) to the top control set (set 1). Do this slowly from left to right allowing the child to discriminate. Allow the child to match one card at a time as you have shown them with the first few. Next match the labels (set 3: label only). Do this slowly as the child has more abstract things to discriminate. Use your finger to point out the first letter in the control set (set 1: picture + label) and compare it to the label (set 3: label only), do this for every letter on the label until you find the matching control card.

Points of interest:
  1. variety of cards (should be changed often)
  2. classification of cards
  3. learning new words
Control of error:
  1. control cards (set 1)
Isolation of difficulty: classifying by a common factor or characteristic

occupy constructive education for peace

ArtistPablo Picasso
Year1937
TypeOil on canvas
Dimensions349 cm × 776 cm (137.4 in × 305.5 in)
LocationMuseo Reina Sofia, Madrid
              
   
                   All that we have in this world we should give to the children who will 'Occupy' tomorrow. I say Occupy Constructive Education for Peace. Teach the children how to become confident independent thinkers and use the Montessori model to educate a new world of competent problem solvers. It is obvious that our current system is not working. We should not initiate our future generations into a world that fosters indifference and breeds victims and totalitarians. Set our children FREE!! As I watch what has gone on around the world from the Arab Spring to the Occupy Wall St. movement I am reminded and invigorated by a series of lectures Maria Montessori made from 1932-1937 in which she caught a glimpse of the future of humanity. I would like to share this with you now:

                     "Education as it is commonly regarded encourages individuals to go their own way and pursue their own personal interests. Schoolchildren are taught not to help one another, not to prompt their classmates who don't know the answers, but to concern themselves only with getting promoted at the end of the year and to win prizes in competitions with fellow pupils. And these poor selfish little creatures, who experimental psychology has proved are mentally exhausted, find themselves in later life like separate grains of sand in the desert; each one is isolated from his neighbor, and all of them are barren. If a storm comes up, these little human particles possessed of no life-giving spirituality are caught up in the gusts and form a deadly whirlwind. An education capable of saving humanity is no small undertaking; it involves the spiritual undertaking of man, the enhancement of his value as an individual, and the preparation of young people to understand the times in which they live. The secret is this: making it possible for man to become the master of the mechanical environment that oppresses him today...Today these energies are scattered; or rather, they are repressed and misdirected through the errors perpetuated by a kind of education that still holds sway all over the world. The adult does not understand the child. Parents unconsciously battle with their children rather than helping them in their divine mission. Fathers and sons do not understand each other. An abyss yawns between them from the day the child is born. And this lack of understanding is man’s undoing; it leads him astray, sickens his spirit, impoverishes him, and makes him fail to realize his potential. The lack of understanding between children and adults precipitates the tragedy of the human heart, which in later life manifests itself in lack of sensitivity, in sloth, and in criminality. Those who have been humiliated are ashamed of themselves; the timid withdraw into their shells; the fearful seek their own personal comfort. All the potential wealth of man’s personality comes to nothing. Education must take advantage of the value of hidden instincts that guides man as he builds his own life. Powerful among these instincts is the social drive...The youngsters personality must come into contact with the world of production after an apprenticeship in experience; man must be guided first and foremost toward and awareness of his responsibilities with regard to human social organization...Society can be organized in short, only if education offers man a ladder of social experiences as he passes from one period of his life to another."

-Maria Montessori


Education and Peace, pgs. 30-32 (Clio Montessori Series: Vol. 10)
ISBN 1-85109-168-8
Taken from a selection of speeches, delivered by Maria Montessori at international congresses and peace councils.

MONTESSORI fall pin punching


Pin punching is a fine motor activity for the young child who cannot yet cut with scissors, who are developing thier pencil grip and who are fullfilling their need for attention to detail. In a Montesori classroom you would find this work on the art shelf. Children love this work and it is not uncommon to find a child stay with this work for hours - perfecting their fine motor. Please make sure that the proper procautions are made for this material to exist in your environment. Express to the child dangers involved in using the punching tool. Make sure the child is holding the puncher with the proper grip.


Materials needed: watchful and tentative teacher, 1/4 inch thick felt sqaure (5.5"x5.5"), paper of varying thicknesses, patterns to trace (metal insets, botany cabinet, geo. cabinet, etc.), tray to hold materials, pin puncher (jumbo push pins).
Presentation:

Invite the child: "Would you like to learn how to seperate paper and create a beautiful paper design?"
Show the child where the material is located on the shelf. Take the material to the table. Give yourself enough area to work and place the tray with materials just above the area you've designated for your work. Take the 1/4" felt from the tray and place in front of you. Retreive a peice of paper with a pattern with a thick black outline. Trace the outline with the tiip of your index finger indicating where you will be punching. With your dominant hand (actually you should be sitting on the dominant side of the child-so if your child's left handed, your dominant hand is left. haha!). With your pincer grip, glide your hand down the center of your punching tool. Pick it up slowly. Show the child the sharp end. "This tool is sharp. It is only for poking paper. Be careful because it could hurt you if your are not careful." Begin your punching slowly and in the same way in which you would hold a pencil. Punch from top and continue clockwise until the pattern is completly seperated from it's oultine. To accomplish this completely, make sure that each hole you punch is as close to the last as the next. :) The paper should come apart easily once you have punched so many holes.

LINKS:

montessori practical life color mixing w/ coffee filter leaves

color mixing coffee filter leaves
You will need to first introduce color mixing work first. You may place the color mixing work on the shelf set up as shown in the picture below. The leaf coloring work should go after, as it is an extension.


initial color mixing work
You may purchase the coffee filter leaves for this activity from Lakeshore - follow the link below. I always buy my bottles. eyedroppers, small containers etc. from Sunburst Bottle Co. They are very reasonable and reliable. I made a control that matches the outline of some of the leaves offered in the leaf packet from Lakeshore. Print, laminate and keep on the shelf with the job.


Materials needed:
tray
small sponge for spills
small container of toothpicks
laminated color mixing control that matches the patterns of the coffee filter leaves
3 small eyedropper bottles full of colored water (1 blue, 1 red, yellow)
basket to hold leaves
dry rack for leaves to dry
Age 4-6 is an approximation; maturity is key
Presentation:
This activity can be presented to a group or individual child. Invite the child to the lesson (be mindful of the children who still need lessons in the initial eyedropper transfer and color mixing work). Show the child where the material is located on the shelf - practical life (high level of difficulty).
Carry the tray to the table. Sit down on the dominant side of the child. Place the tray above your designated work area. Retrieve the laminated color  mixing control and place it in front of you. Place eyedropper bottles in a line on the tray (red, yellow, blue). Place your coffee filter leaf to the left of you and the control. Begin by twisting the red eyedropper bottle cap off with care. Slowly and carefully place one drop of colored water on each corresponding red colored dot. Continue until all the colored dots are covered with their appropriate colored water. The droplets will resemble candy dots as they stand alone on the surface of the laminated control. Carefully (don't shake the table or move the control) take out one toothpick from the toothpick container. Take the toothpick and with a small circular motion mix one circle full of color at a time. When all the circles have been mixed place the coffee filter leaf on top of the control and watch how the color bleeds in to the white. When there is no more white, peel the leaf off of the control like you would a sticker and place it on the dry rack. Next is perhaps the most important part of all - clean up. Make sure the whole job is dry (you may need a drying towel) and return it to the shelf. Replenish for the next person by placing a leaf on the job for the next person. When the leaves are dry, which doesn't take very long at all, they can be hung or taped up in the window for the light to shine through.