Showing posts with label fall. Show all posts

MONTESSORI fall pin punching


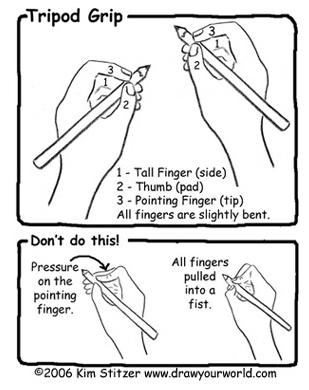
Pin punching is a fine motor activity for the young child who cannot yet cut with scissors, who are developing thier pencil grip and who are fullfilling their need for attention to detail. In a Montesori classroom you would find this work on the art shelf. Children love this work and it is not uncommon to find a child stay with this work for hours - perfecting their fine motor. Please make sure that the proper procautions are made for this material to exist in your environment. Express to the child dangers involved in using the punching tool. Make sure the child is holding the puncher with the proper grip.

Materials needed: watchful and tentative teacher, 1/4 inch thick felt sqaure (5.5"x5.5"), paper of varying thicknesses, patterns to trace (metal insets, botany cabinet, geo. cabinet, etc.), tray to hold materials, pin puncher (jumbo push pins).
Presentation:

Invite the child: "Would you like to learn how to seperate paper and create a beautiful paper design?"
Show the child where the material is located on the shelf. Take the material to the table. Give yourself enough area to work and place the tray with materials just above the area you've designated for your work. Take the 1/4" felt from the tray and place in front of you. Retreive a peice of paper with a pattern with a thick black outline. Trace the outline with the tiip of your index finger indicating where you will be punching. With your dominant hand (actually you should be sitting on the dominant side of the child-so if your child's left handed, your dominant hand is left. haha!). With your pincer grip, glide your hand down the center of your punching tool. Pick it up slowly. Show the child the sharp end. "This tool is sharp. It is only for poking paper. Be careful because it could hurt you if your are not careful." Begin your punching slowly and in the same way in which you would hold a pencil. Punch from top and continue clockwise until the pattern is completly seperated from it's oultine. To accomplish this completely, make sure that each hole you punch is as close to the last as the next. :) The paper should come apart easily once you have punched so many holes.

LINKS:

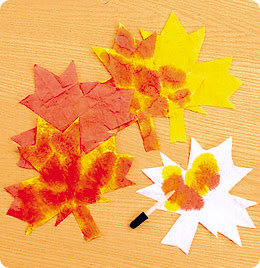
montessori practical life color mixing w/ coffee filter leaves

color mixing coffee filter leaves
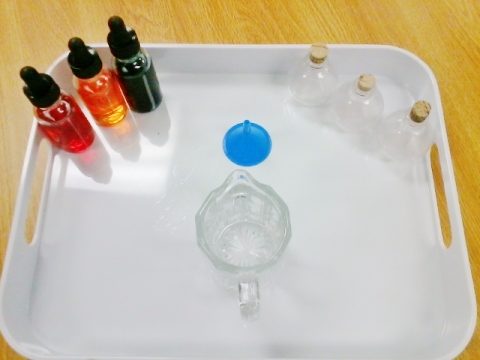
You will need to first introduce color mixing work first. You may place the color mixing work on the shelf set up as shown in the picture below. The leaf coloring work should go after, as it is an extension.


initial color mixing work
You may purchase the coffee filter leaves for this activity from Lakeshore - follow the link below. I always buy my bottles. eyedroppers, small containers etc. from Sunburst Bottle Co. They are very reasonable and reliable. I made a control that matches the outline of some of the leaves offered in the leaf packet from Lakeshore. Print, laminate and keep on the shelf with the job.


Materials needed:
tray
small sponge for spills
small container of toothpicks
laminated color mixing control that matches the patterns of the coffee filter leaves
3 small eyedropper bottles full of colored water (1 blue, 1 red, yellow)
basket to hold leaves
dry rack for leaves to dry
Age 4-6 is an approximation; maturity is key
Presentation:
This activity can be presented to a group or individual child. Invite the child to the lesson (be mindful of the children who still need lessons in the initial eyedropper transfer and color mixing work). Show the child where the material is located on the shelf - practical life (high level of difficulty).
Carry the tray to the table. Sit down on the dominant side of the child. Place the tray above your designated work area. Retrieve the laminated color  mixing control and place it in front of you. Place eyedropper bottles in a line on the tray (red, yellow, blue). Place your coffee filter leaf to the left of you and the control. Begin by twisting the red eyedropper bottle cap off with care. Slowly and carefully place one drop of colored water on each corresponding red colored dot. Continue until all the colored dots are covered with their appropriate colored water. The droplets will resemble candy dots as they stand alone on the surface of the laminated control. Carefully (don't shake the table or move the control) take out one toothpick from the toothpick container. Take the toothpick and with a small circular motion mix one circle full of color at a time. When all the circles have been mixed place the coffee filter leaf on top of the control and watch how the color bleeds in to the white. When there is no more white, peel the leaf off of the control like you would a sticker and place it on the dry rack. Next is perhaps the most important part of all - clean up. Make sure the whole job is dry (you may need a drying towel) and return it to the shelf. Replenish for the next person by placing a leaf on the job for the next person. When the leaves are dry, which doesn't take very long at all, they can be hung or taped up in the window for the light to shine through.

montessori Pumpkin Crafts

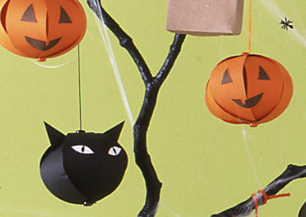
Pumpkin Ornament:


http://www.marthastewart.com/268708/bewitching-tree-decoration
I think I first saw this activity as a Halloween decoration in a Martha Stewart magazine and decided that I'd teach children 4-6 how to do it as long as they knew how to use scissors and had the attention span. This activity contains multiple steps so be prepared to work closely with your group or child depending on your classroom dynamics. The way that I saw these ornaments displayed was on an ornamental tree. Materials that you will absolutely need are brads, orange paper (not card stock), a hole puncher (w/ small tray), scissors, tacky glue, green yarn and a tray to hold the materials. Make sure that there is a place accessible to the children where the templates can be stored.

Invite the child to the activity. Tell the child, "Today we will be making a pumpkin ornament. An ornament is a decoration. This particular ornament is a decoration for Halloween." *smile* Show them where the tray for this job is located and where the paper template is stored on the paper shelf. Take the tray back to the table. Return to the shelf to retrieve a paper template. Return to the table. At this point, run the tip of your finger along the dark black lines of the template where you will be cutting. "This is where we will be cutting. I should get scissors." Carefully retrieve the scissors in the same manner you would in an initial scissor work exercise. (~walking carefully with the scissors on a tray) Begin cutting on the thick dark lines of the template and place the strips you will be using to the left of you. Place any scraps on the scissor tray and use it to discard the scraps. Return to the table after discarding the scraps. Place the scissors back on the scissor tray and place them to the upper right of your work area. Take your materials off of the job tray you originally got from the shelf. Place them in order leaving enough area to work.
1. paper strips
2. hole punch on its small tray
3. small container of brads
4. small green ball of yarn
5. scissors
6. tacky glue
"Now we are ready to construct our ornament." Hold the hole punch properly so that the child can see how your are using it. Punch where ever there is a black dot at the end of each strip. Allow the punched paper to fall onto the small tray. Discard any punched paper and return to the table. Replace the hole puncher above your work area. Take the container of brads and get 2 brads. Count, "one-two". Carefully place one side of each strip of paper onto the brad. Open the brad to secure one side of the ornament. Next, secure the opposite end of the strips of papers in the same way. Except make sure that the brad is pointed into the ornament and not out of the ornament. The ornament should begin taking a round shape at this time. Try not to tear the paper. Your ornament is almost finished! Take the green yarn and wrap it two times around your hand and cut that piece off. Now you have the string that will hang your ornament. Tie a loop on one of the brads for the child if they cannot do it them selves. (Children can learn how to tie at at least age 4 1/2.) You will have a rectangle piece of paper with jack-o-lantern face on it. You may choose at this time to let them take home the card or cut out the black shapes and tacky glue them onto their jack-o-lantern.


NOTE: I try and have a small container of leaf templates for the child to cut out, punch out and write their name on. Either way you will have to decide in your preparation of the activity when and where they will put their name. If you choose not to provide leaves, strips of tape, or pre-printed name tags - they will have to write their name somewhere. It is much easier to write on a flat surface then on a finished round ornament. Just sayin'.
LINKS:
http://www.marthastewart.com/268708/bewitching-tree-decoration
http://www.twopeasinabucket.com/cg_display.asp?cmd=display&seed_id=30366
http://bytesizedpieces.wordpress.com/2010/04/18/stash-bust-pacman-paper-lantern/
http://www.naturallyeducational.com/2010/10/paper-pumpkin-craft/

montessori nomenclature FREE Parts of a Pumpkin 3 part cards & book


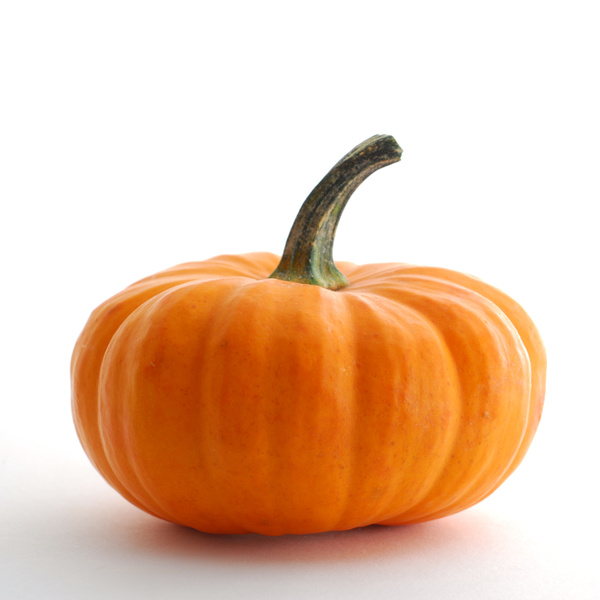
            During group time explain to the children that you are going to examine the fruit. Place a pumpkin onto the cutting board, and talk about the shape, color, texture, plant v. animal, where it grows. Carefully cut the pumpkin in half if it is a small pumpkin. Otherwise have a pre-cut pumpkin on hand. Return the knife to a safe place. Have the children take turns describing what they see. Assist the children in naming the parts of the fruit. Use the 3 period lesson. Place the fruit on the nature table for the children to observe. Make 3 part cards and books available to children.
Parts of_book PDF
3 part cards PDF


Nomenclature: 
pericarp-      the walls of a ripened fruit
exocarp-      the outer layer of a pericarp
mesocarp-    the flesh part of the fruit
endocarp-    the inner layer of a ripened fruit
History:
              The origin of pumpkins is not definitively known, although they are thought to have originated in North America. The oldest evidence, pumpkin-related seeds dating between 7000 and 5500 BC, were found in Mexico.Pumpkins are a squash-like fruit that range in size from less than 1 pound (0.45 kilograms) to over 1,000 pounds (450 kilograms).
             Pumpkins are a warm-weather crop that is usually planted in early July. The specific conditions necessary for growing pumpkins require that soil temperatures three inches (7.62 cm) deep are at least 60 °F (15.5 °C) and soil that holds water well. Pumpkin crops may suffer if there is a lack of water or because of cold temperatures (in this case, below 65 °F (18.3 °C); frost can be detrimental), and sandy soil with poor water retention or poorly drained soils that become waterlogged after heavy rain. Pumpkins are, however, rather hardy, and even if many leaves and portions of the vine are removed or damaged, the plant can very quickly re-grow secondary vines to replace what was removed.

You might also like:
Life cycle of a Pumpkin- by Montessori for Everyone
http://www.montessoriforeveryone.com/assets/PDF/Life_Cycle_of_a_Pumpkin.pdf

Links: