Direct purpose is to develop hand-eye coordination, and muscular control.
Indirect preparation for writing.
PREPARATION OF THE ENVIRONMENT:
Traditionally the sewing material has been stored on the practical life shelf layed out in baskets (which takes up lots of room). I have stored each step in drawers such as those made of plastic (ikea no longer makes the FERA wooden drawers :( you'll have to score them second hand). The drawers serve as a storage unit for the materials. The children use a flat basket or small tray to gather the tools and materials from the drawer they are qualified to use.
Here is an example of what I mean:
 |
| pin cushion practice |
Practicing pushing pins into a pin cushion is an absorbing fine motor activity appropriate for the mature child that is interested in sewing. This job is also perfect for children who are not quite ready for the multiple steps required in most sewing activities.
Materials: extreme caution, watchful and attentive adult, 12-18 pins varying colors to be sorted, small dish for pins, pin cushion, dish for pin cushion, tray to hold all materials.
Presentation: Invite the child to do the exercise. Show them where the material is located on the shelf. Carry the tray carefully to the table. Sit on the child's dominant side. Talk about the precaution needed in using this material. 'These pins are only for the pin cushion' , 'Always make sure the pins stay with the job', etc. Remove a pin from the dish using your dominant hand holding it between the index finger and thumb. With your sub dominant hand, hold the pin cushion in place so it doesn't get away from you while you are pushing the pin in to it. Finish the task of pushing each pin into the pin cushion. Remove the pin from the pin cushion before replacing the job on the shelf. Allow the child to do this job if they have had a lesson. Use your best judgment in placing this material in you classroom. The intent is to teach children how to the sewing materials responsibly.
 |
| oil cloth / embroidery practice stitch practice |
1.
This would be considered drawer (1) of your storage unit if you are choosing to consolidate this unit. This is an extension to the lacing boards we are all accustomed to. This activity is SUPER easy to make yourself and with the varieties of oil cloth these days, the possibilities are endless!
Just make sure to pre punch the holes with a hole punch.
Materials: small wood embroidery hoop, oil cloth of your choice & shoe lace (one side stiff / one side knotted).
Presentation: Invite the child to the lesson. "We are going to practice stitching." Show the child where the material is located on the shelf. Show them where the baskets for gathering the materials are located. Get a basket, hold it firmly in one hand and open the top drawer with the other hand gather one lace, one embroidery hoop with oil cloth attached. Take your materials back to the table. Place the basket in the upper left hand corner of your work area. Place the hoop with oil cloth attached to the right of the basket. Begin by unwinding the lace and placing it across the table in front of you. Place the stiff side to the left and knotted side to the right. 3 finger pincer grasp the left side of the lace with your dominant hand. Pick up the hoop with oil cloth attached with your sub dominant hand. Flip the hoop over and thread your lace through one of the holes. Gently pull until you can pull no further - the knot at the end of the lace should stop you from threading any further. Flip the hoop over and continue the over and under motion until there are no more holes to be stitched. Before returning the material to the drawer make sure your remove the gently remove the lace from the oil cloth. Oil cloth can tear if it is pulled to hard so to preserve the integrity of the material make sure that you are gentle when removing the lace. Once you have removed the lace from the holes in the oil cloth, you can begin winding up the lace. Use the middle and index fingers of your sub dominant hand to wind the lace. Finished!
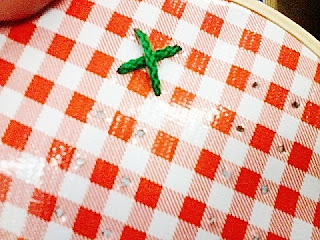
The oil cross stitch practice is also stored in the first drawer. It is one step up from the stitch practice above. The challenge in this job is that the holes for stitching are smaller and the child is expected to cross stitch. Assume the lesson plan for stitching but be aware that you are to continue your stitches diagonally so as to create the cross stitch design.
 |
| oil cross stitch practice |
You will want to make this material too. It is a little more detail oriented to make. I bought gingham oil cloth for this. I imagine you can use whatever oil cloth you can find for this. You will notice with this material that the holes for practice are much smaller than the holes made by a hole puncher. The way that I did this was by burning the holes with a heated extra large safety pin. I made this material in a well ventilated area away from children. I pre marked the holes with a permanent marker before I began making the holes. I used a lighter and an extra large safety pin. First, I heated the safety pin and while it was hot, punctured the places I marked. I had to heat the pin every time I punctured and there was a tiny bit of smoke. Allow the melted oil cloth to completely dry before working with it, I suggest overnight. The type of lace I used for this was slightly smaller in width only because I had some extra laying around.
2.
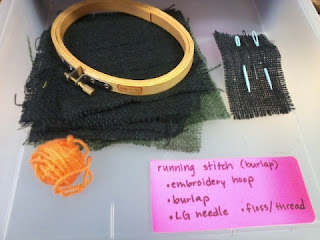
This activity is another stitching activity except the children can take this one home. Burlap can be found in many colors. I myself have found colors for every season. Can you guess what month this picture was taken in? Drawer (2) Materials: extra small embroidery hoop, squares of burlap with one line pulled out, extra large needles and yarn/embroidery floss.
Presentation: Invite the child to the lesson. Show the child where the material is located in the shelf. Show the child where the baskets are located to gather the material from the drawer. Hold the basket with you sub dominant hand while using your dominant hand to pull open the drawer and gather your material. For this activity you will gather one embroidery hoop, one piece of burlap, one large needle and yarn/or embroidery floss. Go to the table. Sit on the dominant side of the child. Place your basket in the upper left hand corner of your work area. Show the child how to open the embroidery hoop by unscrewing the clasp and opening the hoop. Place your burlap over your small hoop and then place your larger hoop over that. Screw the clasp to the hoop shut. Next you will need a pair of scissors from the art shelf. Bring the scissors back to the table on a small scissor tray. Place the scissors just below the basket of materials. Take the yarn/ or floss from the basket and measure one arm length and cut it at that length. Thread the yarn/or floss through the extra large needle and tie off the end. Place your threaded needle through the far left side of the hoop and pull. Stitch up and down through the burlap where you had pulled the burlap string out before. Make sure you stitch through each opening in the burlap so that the stitches are real close. When you have reached the other end of the burlap, you can stop and tie off the yarn or floss. Show the child how to take the burlap out of the embroidery hoop and how to carefully put the hoops back together without splitting the wood. Return the material to the drawer and the scissors back to the art shelf.
Note: due to the size of the needles I stored them in a left over piece of burlap instead of a pin cushion, you can also store the needles in an extra small tin box. Also you do not need an embroidery hoop for this lesson, I use it initially for control of movement. Good Luck!
3.
|
|
| embroidery prep on thick grid plastic |
Drawer (3) materials: embroidery patterns, large needles, variety of colored floss.
Assume the lesson plan for the lesson for the burlap stitch lesson. This activity is a more direct preparation for embroidery while still using the regular stitch. Prepare this activity by purchasing stiff embroidery material and/ or plastic shapes from your local craft store. Children can stitch in and out of the open spaces filling all of them until there are no more to fill. I like to give the children a choice of embroidery floss color. Children love this activity because they get to use the stitching skills they have learned to fill in interesting shapes.
4.
Button sewing can be fun for you, the children and the community. Ask parents in one of your school newsletter for button donations. If you end up with more buttons then you can sew, you can always use them in other areas of practical life such as pouring, sorting, spooning, whole hand transfer, etc. This would be Drawer (4) and you will need: 1 embroidery hoop, cloth, variety of buttons, medium needle, pin cushion, and thread/floss.
 |
| button sewing |
Invite the child to the lesson. Show the child where the material is located. Retrieve a basket to hold the materials you will be gathering: 1 arms length of embroidery floss/thread, one needle in pin cushion, scissors (on tray from art shelf), small box of buttons, 1 small piece of cloth, and 1 small embroidery hoop. Begin by pulling out one arms length of floss/thread, cut it, thread it, and knot it. Place it back into the pin cushion for safe keeping for now. Open the embroidery hoop carefully so as not to split the wood. Place the piece of cloth onto the small embroidery hoop and close the larger hoop over it, clasp it shut and place it to the left. All the while choose a button you would like to sew to the cloth. Begin sewing the button to the cloth by pushing the needle through the bottom part of the embroidery hoop and pulling it through. String the button you have chosen on to the needle and thread. Push the needle through the cloth close to where the initial thread was pushed through and pull. Now the button is held in place by this one stitch. Continue as before 2 or 3 more times until you end up on the bottom side of the embroidery hoop. Tie a knot and cut the string. Start sewing another button but remember to tie the end of your string first! Let the child sew to their hearts desire. Help them as needed, like when they accidentally go around with the needle and get all tangled up. Go slow when you are showing them and over emphasize the up and down motion of the button sewing.
Note: in the past I have used heavy fabric like canvas, when you go into the craft store this material can be pricey. If it is not with in your budget to pay for the going price of a heavier cloth consider second hand cloth napkins. I have bought stacks of cloth napkins from goodwill with the sole intention of cutting them up and using them in the sewing drawers.
5.
This possibly the climax of the child's whole sewing experience. As with all the jobs on the shelf there are lessons that must come before others. In this case, drawers 1-4. In this picture the templates have been pre cut for the children. I have seen it where the child gets a piece of felt and is supposed to trace and cut the finger puppet template themselves. I would love to that. I made the
tiny pin cushion for this job because I needed a pin cushion.
Here are the materials needed for this drawer: various colors of cut felt small enough to fit a child's finger (1.5'' x 2''), thread, needle, 2 pins, pin cushion, tacky glue, googly eyes, cotton balls (or balls of wool), and scissors from the scissor shelf.
Presentation: Invite the child to the lesson. Show them where the material is located, they should already be familiar with gathering the materials. Instruct them on what to get. Let them choose two alternate pieces of felt or matching. Alternating patterns help them control the pattern of movements needed for the proper stitch. In order for there to be consistency and so that the edges of the pattern don't crinkle, keep with the same stitch we've been using all along - up and down stitch (not the round about stitch). The thread is not shown in the picture because by this time I was using the thread station shown below. This station is aesthetically pleasing, a curiosity to the children, and incorporates movement! Place the basket in the upper left hand corner of your work area. Lay out your materials in the order in which they will be used: pin cushion, thread, two pieces of the puppet, one cotton ball, and two eye balls. They should already know how to thread the needle, they may need help tieing. Pin the two pieces of felt together and begin stitching in the lower left hand side of the puppet. STOP before you sew the puppet shut. Stuff the puppet with the cotton and glue on the eye balls. You may choose to draw a face with a permanent marker. Finished!
LINKS:
6.
 |
| dolls and pillows |
Drawer (6) follows the same lesson as the drawer prior except, before you sew it all the way shut you stuff it with filler. you can buy filler at the fabric store or you can buy a pillow for under $5 at a store that sells home stuffs. Again, you could have the children trace and cut their own patterns or you could prep them. You'll need more than two pins depending on the size of your pillow. This a really fun activity because you can tailor it to the seasons and holidays.
 |
thread station made from a wooden paper towel holder ;)
|